Things To Do For Halloween 2020.

Things To Do For Halloween 2020.

Hello my lovelies! I hope you’re having a good October so far and are enjoying these autumn days. I love this time of year, getting to cosy up in blankets and baggy jumpers; not to mention the fact that it’s now spooky season and in the run up to Christmas! But before we get started on the Christmas festivities, it’s time for the Halloween ones!

Since we’re all still socially distancing and can’t really go trick or treating this year, I’ve come up with a few things you can do at home this Halloween!

Halloween Bento Box

Let’s get into it.

  • Halloween Costumes Games – Make some cards with halloween costume ideas (or use an app) and taking turns, each person has 60 seconds to find and create the costume they’ve picked out. It makes for some hilarious versions of costumes!
  • Make cute halloween themed bento lunch-boxes. Cute and delicious!

  • Hide sweets around the house and have a trick or treat treasure hunt! Who said you need to go outside to get treats?

  • Have a halloween movie night! I’ve got a movie marathon list here!

  • Carve pumpkins! A Halloween classic that you can do in your pyjamas!

  • Make your own popcorn and experiment with flavours and toppings! I once tried butter popcorn with caramel, white and milk chocolate drizzles on top and it was so good!

  • Have a spooky themed dinner! Or order takeaway, either works haha!
Tarot Cards

  • Hold a virtual Halloween party!

  • Go pumpkin or apple picking!

  • Try out some halloween crafts from pinterest!

  • Do a tarot reading – Something you may not know about me, is that I’m a baby white witch, so I’ll be taking some time to celebrate the full moon, Samhain and I’ll also be doing some tarot readings among other witchy stuff!

  • Have a spooky tea party with halloween themed food and drinks!

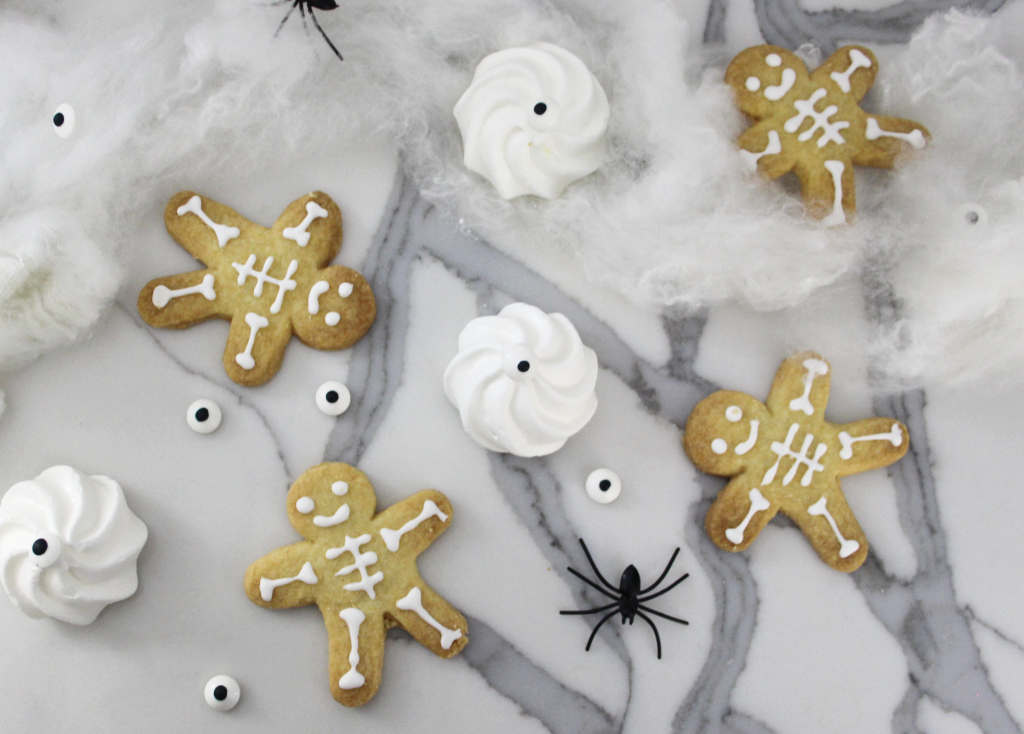
  • Bake some halloween biscuits!

Here’s the Halloween biscuit recipe I used, it’s a very simple one I grabbed from BBC Food and adapted a little:

Ingredients:

Halloween Biscuits
`
  • 100g unsalted butter (room temperature)
  • 100g caster sugar
  • 1 medium free-range egg (lightly whisked/beated)
  • 1 tsp vanilla extract
  • Cinnamon
  • 275g plain flour
  • Icing sugar
  • Water
  • Food colouring

Steps:

  1. Preheat the oven to 190C(170C Fan). Put greaseproof paper in a tray.
  2. Cream together the butter and sugar. Then, beat in the egg and vanilla extract, a little at a time, until well combined; then stir in the flour and cinnamon and bring together to form a dough (if your dough won’t form, add a tiny bit of water or milk).
  3. Roll the dough out on a lightly floured work surface to a thickness of just under 1cm. Using biscuit cutters (I used halloween themed ones), cut biscuits out of the dough and carefully place onto the baking tray.
  4. Bake for 8-12 minutes, or until pale golden-brown. Set aside to harden for 2 minutes, then cool on a wire rack.
  5. Once cool, make up bowls of icing with icing sugar (I just eyeballed it) and gradually add water until the icing is thick but can still be spreaded.
  6. Add in your different colours to the bowls, and then put the icing into piping bags.
  7. Pipe on your designs and leave them to set.
  8. Eat!

These biscuits take about 40 minutes from start to finish, and they’re super simple. If you’re making them with kids you can get them to design their own monsters!

If you make some of your own halloween biscuits tag me in them on instagram @theweightofmyworlds!

Well, those are my ideas for how you can spend Halloween this year! How are you planning on spending your Halloween? Let me know in the comments!

Have a great week my loves and Happy Halloween!

Love

Victoria Blog Signature
Halloween 2020 Ideas
Easy Halloween Pumpkins And Snacks

Easy Halloween Pumpkins And Snacks

Hello lovelies! Halloween is fast approaching; which means we’re all thinking of cool decorations and snacks that we don’t see everyday! And this often means searching the depths of Pinterest for hours on end finding some pins which don’t look impossible to do at home.

So I’ve decided that I’ll put together some pumpkin decorating ideas along with two quick and easy things you can do for Halloween snacks!

Let’s get into it!

Snack first; and because it’s Halloween, that means sweet treats! So I decided to make some cute mini shortbread skeletons and mini meringue eyeballs! They’re pretty quick and easy to make and only took me about 30 minutes from start to finish.

Shortbread skeletons

How cute are these am I right?!

On to making them! You can buy a simple shortbread mix from most supermarket nowadays so that’s what I did as I was short on time.

Here’s the steps:

1 . Make the biscuit dough (you can use any biscuits you like).

2 . Roll out the dough out on a lightly floured surface, making the dough roughly 5mm thick.

3 .  Using a cookie cutter the shape of a person (pick whatever size you want!) cut out as many people as you can. You can always use any small pieces of dough left to make an extra biscuit for when you have a cuppa later!

4 . Bake the biscuits for however long your biscuit recipe requires and leave to cool.

5 . Once the biscuits are cool, using whatever colour icing you want, pipe on a smile, or funny face (it is Halloween aft0er all!) and the rest of the skeleton bodies!

6 . Once the icing is dry. Eat!

Shortbread skeletonsFor the meringue eye balls:

1 . Buy some meringue kisses and some googly eye cake decorations.

2 . Make up a slightly on the thicker side icing with just water and icing sugar.

3 . Dip the googly eyes into the icing and stick on top of the meringue peaks! Done! Nice and simple.

Now, when it comes to Halloween, one of the first things we think about is sweets, costumes and of course, pumpkins. And I don’t know about you, but I love picking and carving pumpkins.. however, I’m not a massive fan of the mess that comes with it.

So this year I decided I would look into some other ways I can decorate some pumpkins, without all of the mess from carving huge ones.

Here’s my pumpkin display:

Pumpkins

These didn’t take very long to do which I was quite surprised about! The pumpkins that took the longest were the ones that required paint, but even then they didn’t take very long.

For the painted pumpkins I used cheap Tesco water based paint as a bottle of these are £1 each which is a bargain! I also used a sharpie for the calligraphy on the large pumpkin, that one is my favourite.

Pumpkins

Decorating the painted pumpkins were my favourite to do overall, because I love to paint anyway. The multi coloured pumpkin was decorated by squeezing paint over the top of it, a bit like how you would chocolate drips on a cake, and I simply layered up the different colours until the top of the pumpkin was covered and the paint were dripping down the sides. I suggest doing this over newspaper or some kind of wipeable surface as it gets pretty messy! I left mine to dry over a few days and the paint ran down to the bottom leaving a cool pattern.

Pumpkins

For the biggest pumpkin, I mixed a mint green colour because I wanted the calligraphy to really stand out against the paint. Because pumpkins are pretty shiny, I ended up applying three layers of paint, but it didn’t take very long as I used my hairdryer to speed up the drying process a bit! Once I was happy with the colour of the pumpkin, I lightly drew out the ‘trick or treat’ and then filled it in with a sharpie!

The last pumpkin I painted was a tiny one, and I realised that I like the simple look of the painted pumpkins so I painted this one black and then splattered white paint on it which I think looks pretty elegant.. especially considering it’s a pumpkin!

Pumpkins

I bought a bag of cobwebs and spiders which I used for the only pumpkin I fully carved, and I think it worked quite nicely. I actually carved this pumpkin from the bottom, because I think it looks nicer than the open top, and you can hide your carving marks. I also found a cool tip for making your carved pumpkins last longer, which is by brushing the carved areas with vegetable oil! I also stuck some spiders on the top for eyes, because I hadn’t seen anything like that done before and just thought why not.

Mini Pumpkin with fangs

I will admit, I think I like these two pumpkins nearly as much as the painted ones; not because they’re elegant, because they certainly aren’t that! But they are cute and pretty funny. I recommend that you have a sharp knife for cutting a mouth for these because these small pumpkin/squashes are very hard to cut! I bought some cheap vampire fangs and used peppercorns for eyes on these, all I had to do was cut a section large enough for the fangs and made some indents for the eyes and tadaa! Mini silly pumpkins!

What are your favourite ways to carve and decorate pumpkins? And what are your favourite sweet treats to make at Halloween? Let me know in the comments!

And lastly, Happy Halloween lovelies!

Love,

Victoria Blog Signature

Pumpkins